
To place recessed lighting in a living room, start by determining specific lighting needs and sketching the room layout. Next, select the right fixtures, then ensure safety by turning off power. Mark hole locations and cut them carefully. Wire the lights using suitable cables and connections, then install the housings and trims. Finally, restore power to test the lights for functionality. Following these steps will help achieve desirable ambiance and light quality, with further insights available for improvement.
Key Takeaways
- Assess your living room layout and identify dark spots needing additional lighting for tasks like reading or socializing.
- Choose the right housing type and trims based on aesthetics, functionality, and energy efficiency like IC-rated housings for safety.
- Mark locations for recessed lights carefully, ensuring equal spacing and alignment for a cohesive look throughout the room.
- Cut holes for fixtures precisely using a template, and verify all markings are level for uniformity in installation.
- Test the installation by restoring power, checking each fixture for proper illumination, and adjusting as necessary for optimal ambiance.
Determine Your Lighting Needs

How can one effectively assess their lighting needs in a living room? A comprehensive lighting assessment begins with cataloging existing light fixtures, evaluating brightness levels, and identifying dark spots. The functionality evaluation should consider how current lighting supports various activities, such as reading, watching TV, or socializing. Room characteristics, including dimensions and natural light sources, also play a crucial role. Noting areas that may require task-specific lighting, like a reading nook, ensures all zones are effectively illuminated. Additionally, evaluating room mood—whether cozy or bright—can guide bulb selection. Integrating ambient, task, and accent lighting systems, along with dimmers for flexibility, leads to a well-lit, harmonious living environment that caters to diverse needs and preferences. Moreover, understanding the purpose of recessed lighting can greatly enhance the effectiveness of your lighting design. To establish a baseline for adequate lighting, consider the room’s size and lumens per square foot needed for a balanced illumination.
Choose the Right Recessed Lighting Components

Selecting the appropriate recessed lighting components involves understanding housing types, trim styles, and bulb options.
Different housing types cater to new construction or remodeling projects, while trim styles influence the aesthetic and functionality of the lighting.
Additionally, choosing the right bulbs impacts brightness, energy efficiency, and the overall ambiance in the living room space.
Housing Type Options
When choosing recessed lighting components for a living room, homeowners must consider various housing type options to ensure functionality and aesthetic appeal. The selection of housing types plays a crucial role in determining installation methods and overall efficiency. Key housing options include new construction, which allows for more style choices but requires pre-ceiling installation, and remodel housings that can fit into existing structures. Other options include IC-rated for insulation contact, airtight housings for energy efficiency, and shallow plenum designs for limited ceiling space. Homeowners should also weigh the benefits of traditional can lights against sleek, canless options.
| Housing Type | Key Features |
|---|---|
| New Construction | More styles; pre-ceiling installation |
| Remodel | Easy for existing ceilings; no major changes |
| IC-Rated | Safe with insulation contact; energy-efficient |
| Airtight | Reduces energy loss and improves air quality |
Trim Styles Overview
Choosing the right trim style for recessed lighting is essential for achieving both functionality and aesthetic harmony in a living room setting. Various trim options cater to specific lighting needs while enhancing décor.
Baffle trims, with their ribbed interiors, reduce glare for a softer light effect, making them ideal for intimate spaces. Reflector trims maximize brightness with a polished surface, suitable for ambient lighting in larger areas.
Adjustable trims, like eyeball and gimbal styles, direct light towards focal points, enhancing trim functionality. Wall wash trims evenly illuminate vertical surfaces, perfect for showcasing artwork.
Lastly, specialty trims, including open and pinhole options, offer unique aesthetics that align with modern design cues, ensuring an appealing visual impact in the living room.
Bulb Selection Guide
What factors should be considered for optimal bulb selection in recessed lighting?
First, a bulb efficiency comparison reveals that LED bulbs are the most energy-efficient, consuming up to 80% less energy than incandescent options.
Next, color temperature selection is crucial; warm white (2700K-3000K) creates a cozy atmosphere, while neutral (3200K-4500K) enhances clarity. Daylight bulbs (>4500K) offer a bright, energizing light suitable for task areas.
Brightness should also be assessed, aiming for 10-20 lumens per square foot, depending on the room’s size and function.
Additionally, considering bulb shape—such as R or BR for directional light—will further optimize lighting design.
Finally, a high Color Rendering Index (CRI) should be prioritized for spaces where true colors are essential.
Ensure Safety and Prepare for Installation
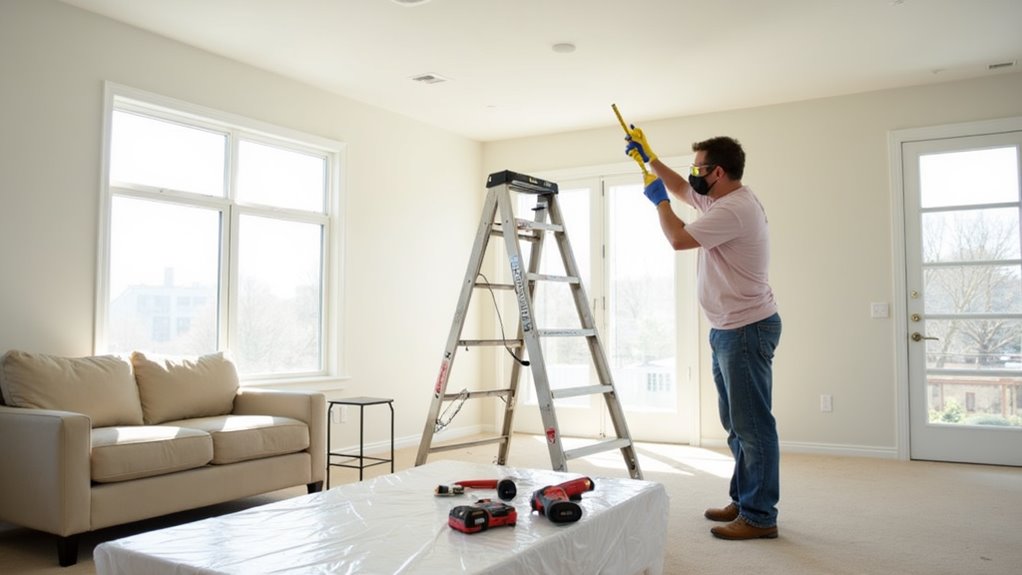
Prior to installing recessed lighting, it is crucial to shut off power at the main circuit breaker and use a voltage tester to ensure safety.
Proper safety gear, including goggles, gloves, and a dust mask, should be worn to protect against potential hazards.
Additionally, clearing the work area of any obstructions will facilitate a smooth installation process and mitigate risks.
Power Shutoff Procedure
Ensuring safety during the installation of recessed lighting begins with a thorough power shutoff procedure. First, locate the electrical panel, typically found in utility areas like basements or garages. Open the service panel door and identify the breaker for the living room; switch it to the “off” position. For complete power shutoff, consider flipping the main breaker.
Next, conduct circuit verification: test that no power is flowing by attempting to turn on a light and using a non-contact voltage tester on outlets. If the power remains, do not proceed, and consult an electrician.
To maintain power safety, implement Lockout/Tagout (LOTO) by applying a lockout device to the breaker, ensuring only the installer can remove it.
Safety Gear Needed
The right safety gear is essential for a successful recessed lighting installation. Eyewear protection, such as safety glasses or goggles, should be utilized to shield the eyes from debris and dust, especially when cutting drywall.
Insulated gloves are crucial for preventing electrical shock and cuts, while rubber insulating gloves offer additional safety. For respiratory protection, N95-rated masks effectively filter fine particles, and those working in dusty ceilings may consider a half-face respirator for prolonged exposure.
Head protection, like hard hats, safeguards against falling debris, particularly in attics. Wearing long-sleeved clothing and sturdy, steel-toed boots enhances overall safety, while ensuring proper tools are used maximizes efficiency and reduces risks during the installation process.
Clear Work Area
With safety gear in place, creating a clear work area plays a vital role in facilitating a smooth recessed lighting installation.
Begin by relocating all furniture, either removing it entirely or grouping it in the center and covering it to prevent dust damage. Take down any wall hangings, curtains, or decorations and ensure there is a clear pathway to the electrical panel.
Manage obstacles by removing items that could pose tripping hazards and providing ample space for ladder movement. Lay down drop cloths to protect the flooring, and cover any remaining furniture with plastic sheeting.
Lastly, check the ceiling for obstructions before proceeding with installation. A well-organized work area significantly enhances safety and efficiency throughout the process.
Mark and Cut Holes for the Recessed Lights

When planning to install recessed lights in a living room, careful marking and cutting are crucial steps for achieving a professional finish. Proper mark placement ensures optimal lighting effect while accounting for obstruction considerations is essential.
- Determine your lighting purpose, then sketch the room’s dimensions and furniture layout.
- Use a tape measure and laser level to mark the center of each light location, starting from the focal point and working outward.
- Consider any obstructions, using a stud finder to identify joists or ducts.
- Gather tools such as a hole saw, drill, and safety glasses before cutting to ensure a clean, precise hole.
Double-check all markings before proceeding to guarantee even spacing and alignment.
Wire the Recessed Lights
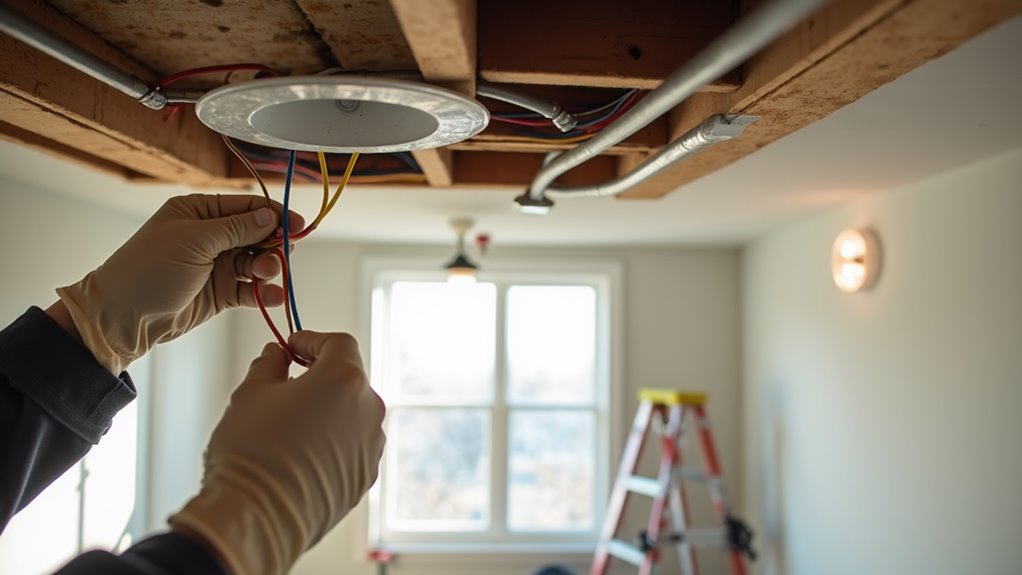
After marking and cutting holes for the recessed lights, attention shifts to wiring them correctly to ensure safe and effective operation. Safety is paramount; electricity should be turned off at the main circuit breaker and verified with a voltage tester. Proper wiring techniques involve running NM-B or Romex cable, following a daisy-chain setup, and securing wires with clamps.
| Wire Type | Usage | Gauge |
|---|---|---|
| NM-B | Typical residential wiring | 12 or 14 |
| Romex | For general lighting circuits | 12 or 14 |
| Ground wire | Safety connection | – |
Connections should be made using wire nuts, ensuring all connections are secure and compliant with local codes.
Install Housings, Trims, and Bulbs
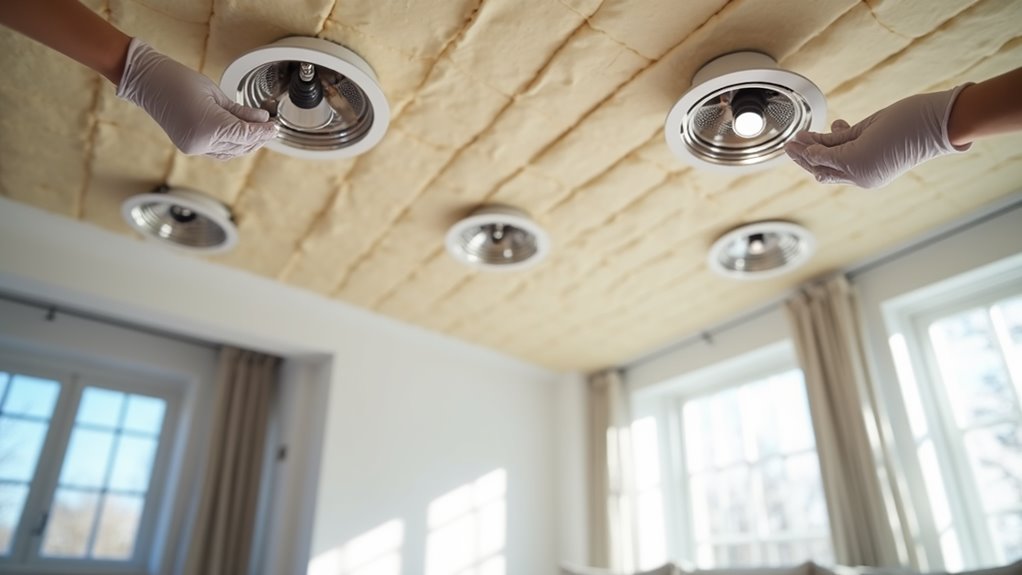
Installing recessed lighting in a living room begins with selecting the appropriate housings, trims, and bulbs to achieve both functionality and aesthetic appeal.
Understanding various recessed lighting options is essential for an effective installation.
Here are key steps to consider:
- Choose Housing Type: Select from new construction, remodel, or IC-rated housing based on your ceiling structure.
- Pick Trims: Select trims that meet your aesthetic preference, such as baffle, reflector, or adjustable trims.
- Install Properly: Use installation tips like securing housing with clips for remodel types and ensuring adequate clearance for non-IC rated fixtures.
- Select Bulbs: Choose bulbs based on desired brightness and energy efficiency, ensuring compatibility with all components.
With these guidelines, the installation process becomes streamlined and efficient.
Test Your New Recessed Lighting
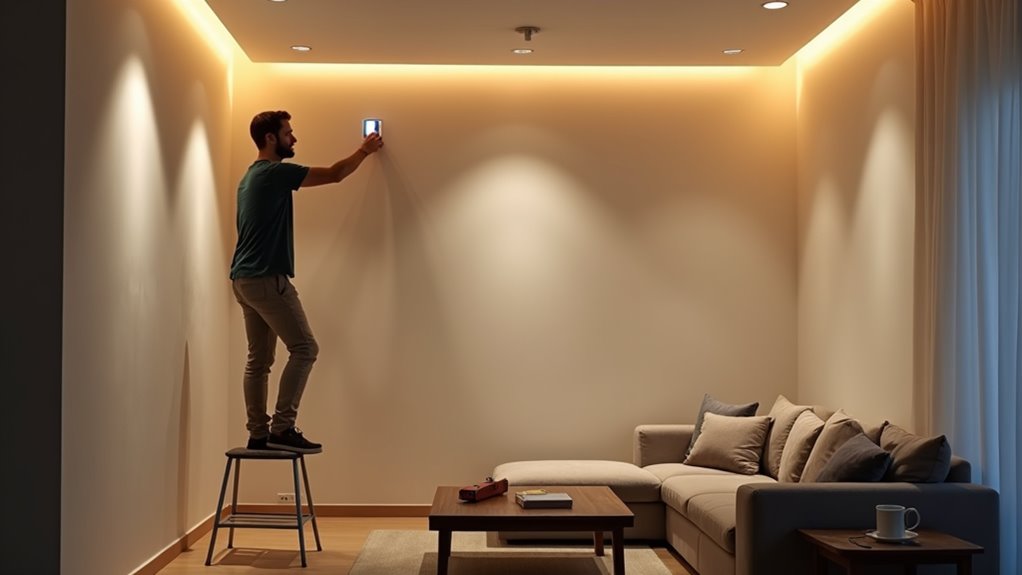
How can one ensure that newly installed recessed lighting functions correctly?
The initial step involves power verification by restoring power at the circuit breaker and turning on the switch to check if all fixtures illuminate. If any lights fail to turn on, power must be turned off for troubleshooting.
Inspect all wiring connections for loose or improper setups, ensuring black wires connect to black, white to white, and ground to ground. Utilize a voltage tester to confirm power is off before any hands-on inspection.
Look for flickering or buzzing, indicating connection issues. Lastly, ensure wattage ratings prevent overheating, and adjust any fixtures for optimal positioning to eliminate glare or shadows, enhancing the overall lighting ambiance.